Opt-In
Opt-In presents consent terms to the customer and creates an Authorization record when they accept. The node sends a message with an accept button — a single tap creates a formal record of consent in the Authorizations API, linked to the customer's identity and the specific policy they agreed to.
This is the first half of a two-step consent process. Opt-In collects agreement and creates the Authorization; OTP Verification can then sign it with a one-time code for stronger proof of identity. Many flows use both steps together, though Opt-In can also stand alone when a button tap is sufficient.
How It Works
The node sends a WhatsApp message containing the consent text and a single button. When the customer taps the button, three things happen: an Authorization record is created in the system (linked to the policy, the borrower, and their identity), the authorization ID is stored in a conversation variable, and the flow advances to the next node.
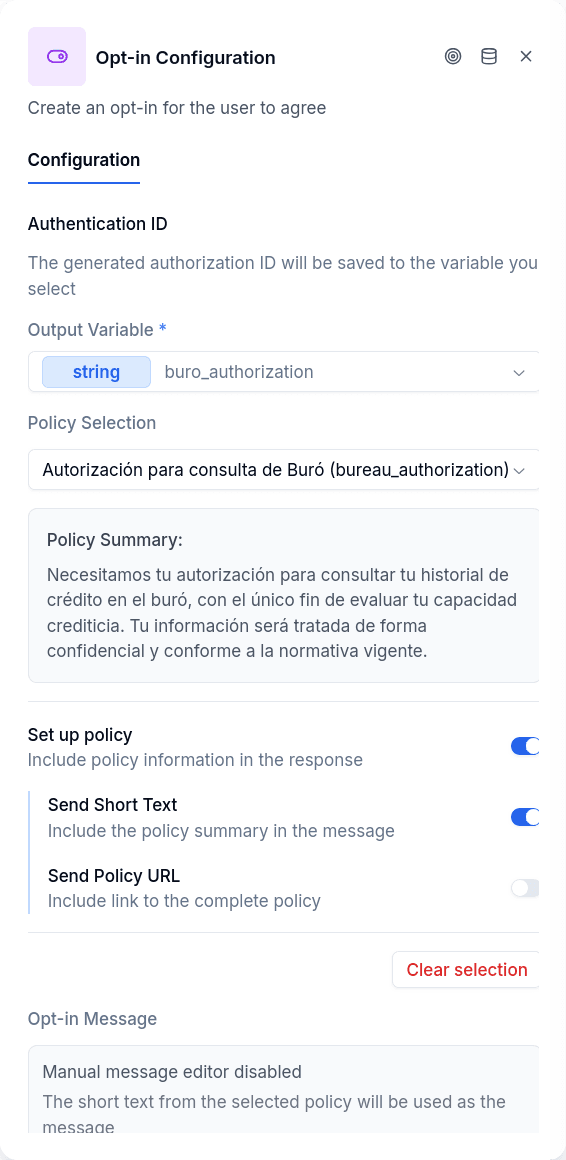
The consent message can come from two places. If use policy short text is enabled, the node pulls the text directly from the policy definition in the data model — keeping consent language consistent with your legal team's wording. Otherwise, you write custom messages in the node configuration.
When to Use It
Any operation that requires documented consent is a good candidate. Some common examples:
Before biometric verification. Liveness checks require documented consent. Place an Opt-In node before Liveness Verification to authorize the processing of biometric data.
Credit bureau authorization. Querying a credit bureau requires the customer's explicit consent. Opt-In creates the authorization record that proves it was given.
Regulatory compliance. Terms acceptance, data processing agreements, privacy policies — any of these can be gated by an Opt-In node.
A Common Pattern: Check Before Asking
A returning customer shouldn't re-authorize something they already agreed to. Use Read Authorization first to check whether the authorization already exists. If it does, skip the consent flow entirely.
This avoids redundant prompts and keeps the conversation moving for customers who have already given consent.
Configuration
| Option | Description |
|---|---|
| Policy Key | Which policy is being authorized — must exist in the tenant's data model |
| Authorization Variable | Variable to store the created authorization ID |
| Identity Key | Which identity to link (person_id, tax_id, etc.) |
| Use Policy Short Text | Pull the consent message from the policy definition instead of custom text |
| Messages | Custom consent text (when not using policy short text) |
| Button Label | Text on the accept button (max 20 characters — WhatsApp limit) |
| Send Policy URL | Append the policy's URL to the message |
| URL Prefix | Text before the URL link |
The identity key determines which of the customer's identity documents gets linked to the authorization. In a flow that branches by customer type, an individual path might use person_id (cedula) while a business path uses tax_id (RUC). If no identity key is configured, the system falls back to using the WhatsApp channel information — the phone number becomes the identifier.
Output Handles
| Handle | When |
|---|---|
| Success | Customer tapped the button, authorization created |
| Error | Identity not found, policy doesn't exist, or message delivery failed |
Things to Know
The node waits for the customer to respond. Unlike Message, which sends and immediately continues, Opt-In pauses the flow until the customer taps the accept button. The conversation stays on this node until that happens.
WhatsApp only. The button interaction is currently implemented for WhatsApp. The 20-character limit on button labels is a WhatsApp platform constraint.
The identity must exist on the borrower. If the identity key is set to person_id but the borrower doesn't have that identity record, the node routes to the error handle. Make sure the identity has been collected — via Login, Create Borrower, or Customer Update — before this node runs.
The policy must exist in the data model. Referencing a nonexistent policy key routes to the error handle. Verify the key matches what's configured in the tenant's data model.